ElasticSearch
安装
npm install @elastic/elasticsearch
使用
const { Client } = require('@elastic/elasticsearch');
const client = new Client({ node: 'http://localhost:9200' });
index 表示索引;size 表示每页的数据条数,默认 10;from 表示跳过开始的结果数,默认 0,比如第一页返回 10 条数据,第二页就从第 11 条开始返回,即 from 为 10
client
  .search({
    index: 'lgbzdzk',
    size: 10,
    from: 0,
    body: {
      track_total_hits: true, // 默认值为10000,设为true后可精确计数
      query: {
        match: {
          name: '高级前端'
        }
      },
      aggs: {
        house_count: {
          cardinality: {
            field: 'RZF_XZDXXDZ.keyword'
          }
        }
      }
    }
  })
  .then(res => {
    let total = res.body.hits.total;
    let arrPoint = res.body.hits.hits;
    console.log(arrPoint);
    console.log(total);
    console.log(res.body.aggregations); // 房屋去重计数
  })
  .catch(e => {
    console.log(e);
  });
搜索
通用匹配
{
  "query": {
    "match": {
      "name": "高级前端"
    }
  }
}
自动分词,会将含有“高级”和“前端”字样的数据都匹配出来
短语匹配
短语匹配不存在分词的情况,类似于精确匹配
{
  "query": {
    "match_phrase": {
      "BIP_XM": "张三丰"
    }
  }
}
多字段匹配
多个字段内只要含有关键词都会被匹配出来
{
  "query": {
    "multi_match": {
      "query": "北京市朝阳区",
      "fields": ["RZF_XZDXXDZ", "RZF_DZ"]
    }
  }
}
布尔查询
must 关键词,表示所有条件必须满足
还有 should 表示或的关系、must_not 表示一定不满足
{
  "query": {
    "bool": {
      "must": [
        {
          "match": {
            "BIP_XM": "张三"
          }
        },
        {
          "term": {
            "BIP_SFZHM": "412824196808303929"
          }
        }
      ]
    }
  }
}
去重计数
统计某个字段上出现的不同值的个数
"house_count"为自定义字段,聚合字段需要 keyword 类型
{
  "query": {},
  "aggs": {
    "house_count": {
      "cardinality": {
        "field": "RZF_XZDXXDZ.keyword"
      }
    }
  }
}
查询 geo_point 类型数据
搜索圆形区域内的点
location 字段应与数据库字段相对应
{
  "query": {
    "bool": {
      "must": {
        "match_all": {}
      },
      "filter": {
        "geo_distance": {
          "distance": "10km",
          "location": [116.52325, 39.87126]
        }
      }
    }
  }
}
搜索矩形范围区域内的点
{
  "query": {
    "bool": {
      "must": {
        "match_all": {}
      },
      "filter": {
        "geo_bounding_box": {
          "location": {
            "top_left": [116.52325, 39.87126],
            "bottom_right": [116.53325, 39.86126]
          }
        }
      }
    }
  }
}
搜索多边形区域内的点
{
  "query": {
    "bool": {
      "must": {
        "match_all": {}
      },
      "filter": {
        "geo_polygon": {
          "location": {
            "points": [
              [116.529251, 39.870735],
              [116.487755, 39.670625],
              [116.568255, 39.770525]
            ]
          }
        }
      }
    }
  }
}
数据导入
文档:https://www.elastic.co/guide/en/elasticsearch/reference/current/docs-bulk.html
node 版本的文档:https://www.elastic.co/guide/en/elasticsearch/client/javascript-api/current/api-reference.html#_bulk
批量导入bulk
删除
https://www.elastic.co/guide/en/elasticsearch/reference/current/docs-delete.html
DELETE /<index>/_doc/<_id>
假如要删除某个索引下的所有数据
curl -X DELETE "localhost:9200/index111/_doc/1?pretty"
还有一种删除方式就是查询删除,先查询到index111索引下的所有数据,然后全部删除。注意索引还在! 一次删不干净就多来几次(看 total 和 deleted 是否都是 0)
https://www.elastic.co/guide/en/elasticsearch/client/javascript-api/current/api-reference.html#_deletebyquery
function dellgAllData() {
  client
    .deleteByQuery({
      index: 'index111',
      body: {
        query: {
          match_all: {}
        }
      }
    })
    .then(res => console.log(res))
    .catch(err => console.log(err));
}
dellgAllData();
查看索引是否存在
function indexExists(index) {
  return client.indices.exists({
    index: index
  });
}
根据某个字段精确删除
client
  .deleteByQuery({
    index: 'wlxt_beijing_xiangzhenjie',
    body: {
      query: {
        match_phrase: {
          'properties.name': '博兴街道小区'
        }
      }
    }
  })
  .then(res => {
    console.log(res);
  });
修改
https://www.elastic.co/guide/en/elasticsearch/reference/current/docs-update.html
POST /<index>/_update/<_id>
node 版本 api:https://www.elastic.co/guide/en/elasticsearch/client/javascript-api/current/api-reference.html#_update
集群
在elasticsearch.yml中添加如下内容:
cluster.name: elasticsearch #集群名称,唯一
node.name: node12 #节点名称
node.master: true #主节点
node.data: true #数据节点
cluster.initial_master_nodes: ['node10', 'node11', 'node12'] #集群的主节点
network.bind_host: 0.0.0.0 #设置可以访问的ip,默认为0.0.0.0,这里全部设置通过
network.publish_host: 192.168.18.12 #设置其它结点和该结点通信的ip地址
http.port: 9200 #设置对外服务的http端口,默认为9200
transport.tcp.port: 9300 #设置节点之间通信的tcp端口,默认是9300
transport.tcp.compress: true #设置是否压缩tcp传输时的数据,默认false
discovery.zen.ping.unicast.hosts: ['192.168.18.10', '192.168.18.11', '192.168.18.12'] #集群的主节点
discovery.zen.minimum_master_nodes: 2 #自动发现主节点的最小数 N = 节点数/2 + 1
http.cors.enabled: true
http.cors.allow-origin: '*'
首先进入 elasticsearch 的配置文件,比如
cd /mntdata/docker/var/lib/docker/volumes/es/confing/
输入ll可查看子目录,直到出现elasticsearch.yml
编辑 es 配置文件,点击insert键开始编辑,编辑完成后点击Ecs键,输入:wq保存退出。:q退出不保存,:wq!强制保存退出
vim elasticsearch.yml
接着重启 es 容器
docker restart es
注意 es 这个容器名字根据实际来定,可输入以下命令显示所有的容器,包括未运行的
docker ps -a
其他命令:
docker image ls   #列出镜像

docker logs es   #查看es日志

pwd   #显示工作目录

history #查看命令的历史记录

free -h  #查看内存
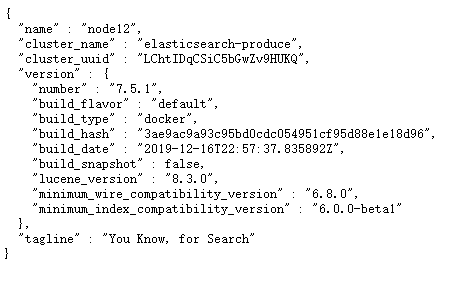
最后在浏览器输入192.168.18.10:9200、192.168.18.11:9200或者192.168.18.12:9200均可看到下图所示内容:

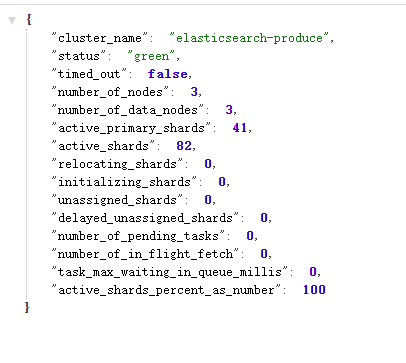
查看集群状态:http://192.168.18.12:9200/_cluster/health

status字段是 green 表示集群正常可用
在两个节点上查看所有索引,可以看到所有索引都同步
/_cat/indices
其他
查看分片 http://192.168.18.19:9200/_cat/shards

查看索引 http://192.168.18.19:9200/_cluster/health?level=indices

查看分片 http://192.168.18.19:9200/_cluster/health?level=shards
FAQ
1、报错 max virtual memory areas vm.max_map_count [65530] is too low, increase to at least [262144]
切换到 root 用户修改配置sysctl.conf
vi /etc/sysctl.conf
添加下面配置:
vm.max_map_count=262144
执行
sysctl -p
重新启动 elasticsearch
2、文件无权限
报错信息如下:
java.lang.IllegalStateException: failed to obtain node locks, tried [[/usr/share/elasticsearch/data]] with lock id [0]; maybe these locations are not writable or multiple nodes were started without increasing [node.max_local_storage_nodes] (was [1])?

java.io.IOException: failed to obtain lock on /usr/share/elasticsearch/data/nodes/0

java.nio.file.AccessDeniedException: /usr/share/elasticsearch/data/nodes/0/node.lock
这是文件没有访问权限,此处在/mntdata/docker/var/lib/docker/db_data_volumes目录下输入
chmod -R 777 /mntdata/docker/var/lib/docker/db_data_volumes/dockercompose_sxmap-search-elasticsearch
找到docker-compose配置文件cd /mntdata/map-server/docker-compose/,可以看到/usr/share/elasticsearch/data存放 es 数据的目录映射到了上边的目录
/mntdata/docker/var/lib/docker/db_data_volumes/dockercompose_sxmap-search-elasticsearch,注意目录结构根据自己的实际目录来定。
下面就是map-search-docker-compose.yml配置文件
version: '2.1'
services:
  sxmap-elasticsearch:
    image: elasticsearch:7.5.1
    restart: always
    #environment:
    # - discovery.type=single-node
    volumes:
      - /mntdata/docker/var/lib/docker/db_data_volumes/dockercompose_sxmap-search-elasticsearch:/usr/share/elasticsearch/data
      - /mntdata/docker/var/lib/docker/db_data_volumes/dockercompose_sxmap-search-elasticsearch-config:/usr/share/elasticsearch/config
    ports:
      - 9200:9200
      - 9300:9300
  sxmap-search-node:
    image: sxmap/mapsearch:last
    restart: always
    environment:
      - GEOSERVER=http://geoserver:8080/geoserver
      - ELASTICSEARCH=http://sxmap-elasticsearch:9200
    volumes:
      - sxmap-search-node:/opt/mapSearch
    ports:
      - '9999:5000'
3、报错with the same id but is a different node instance
这种情况一般是复制节点造成的,比如在集群中新增一个节点,通常会复制一个已经存在的节点,这样会将节点数据也复制过来, 所以删除存放 elsticsearch 数据的文件夹中的节点数据即可。
rm -rf /mntdata/docker/var/lib/docker/db_data_volumes/dockercompose_sxmap-search-elasticsearch/nodes/
如果删除时报错Directory not empty或者Device or resource busy,将容器先停掉
docker stop dockercompose_sxmap-elasticsearch_1
再执行删除命令就能删掉数据,然后重启容器即可。
如果报错failed to find metadata for existing index,解决方法同上删除 nodes 文件夹
4、有分片未分配
/_cluster/health查询集群状态发现
{
  "cluster_name": "elasticsearch-produce",
  "status": "red", // red状态表示有主分片未分配
  "timed_out": false,
  "number_of_nodes": 3,
  "number_of_data_nodes": 3,
  "active_primary_shards": 41,
  "active_shards": 82,
  "relocating_shards": 0,
  "initializing_shards": 0,
  "unassigned_shards": 6, // 表示有6个分片未分配
  "delayed_unassigned_shards": 0,
  "number_of_pending_tasks": 0,
  "number_of_in_flight_fetch": 0,
  "task_max_waiting_in_queue_millis": 0,
  "active_shards_percent_as_number": 92.234 // 集群健康值,100表示完全可用
}
分片未分配意味着有部分数据不可用,查看报错信息 GET /_cluster/allocation/explain?pretty,加上?pretty能让结果格式美化,即 json
curl -X GET "192.168.18.19:9200/_cluster/allocation/explain?pretty" -H 'Content-Type: application/json' -d'
{
    "index": "wlxt_beijing_xiangzhenjie",
    "shard": 0,
    "primary": true
}'
此处shard位置是 0,可以通过/_cat/shards查看,返回结果如下:
{
  "index": "wlxt_beijing_xiangzhenjie",
  "shard": 0,
  "primary": true,
  "current_state": "unassigned",
  "unassigned_info": {
    "reason": "CLUSTER_RECOVERED",
    "at": "2020-08-26T01:37:00.682Z",
    "last_allocation_status": "no_valid_shard_copy"
  },
  "can_allocate": "no_valid_shard_copy",
  "allocate_explanation": "cannot allocate because all found copies of the shard are either stale or corrupt",
  "node_allocation_decisions": [
    {
      "node_id": "Ghz5Ah-JQIS9dh6OnstNlg",
      "node_name": "node12",
      "transport_address": "192.168.18.12:9300",
      "node_attributes": {
        "ml.machine_memory": "33565294592",
        "xpack.installed": "true",
        "ml.max_open_jobs": "20"
      },
      "node_decision": "no",
      "store": {
        "found": false
      }
    },
    {
      "node_id": "O0pvUfQfTJe6PV0fRLCCTA",
      "node_name": "node19",
      "transport_address": "192.168.18.19:9300",
      "node_attributes": {
        "ml.machine_memory": "33565294592",
        "ml.max_open_jobs": "20",
        "xpack.installed": "true"
      },
      "node_decision": "no",
      "store": {
        "in_sync": false,
        "allocation_id": "YIGvfbADT0abRdggsiu9Ow",
        "store_exception": {
          "type": "file_not_found_exception",
          "reason": "no segments* file found in SimpleFSDirectory@/usr/share/elasticsearch/data/nodes/0/indices/2AgVJg-USJebFipphzQdLg/0/index lockFactory=org.apache.lucene.store.NativeFSLockFactory@51f0a901: files: [write.lock]"
        }
      }
    },
    {
      "node_id": "rsDzn8HnRVSpkChaoI3c6A",
      "node_name": "node17",
      "transport_address": "192.168.18.17:9300",
      "node_attributes": {
        "ml.machine_memory": "33565294592",
        "ml.max_open_jobs": "20",
        "xpack.installed": "true"
      },
      "node_decision": "no",
      "store": {
        "in_sync": false,
        "allocation_id": "FmD6r8DXQbWyDIxom9xOjg"
      }
    }
  ]
}
查看未分配的原因是副本分片太旧或损坏,在节点node19上还发现文件丢失,进入目录查看果然没有文件,这时考虑重新手动分配分片POST /_cluster/reroute,
https://www.elastic.co/guide/en/elasticsearch/reference/7.9/cluster-reroute.html
首先考虑手动分配副本分片:allocate_replica,这种方式会保留数据
curl -X POST '192.168.18.19:9200/_cluster/reroute' -H "content-type:application/json" -d '
{
    "commands": [
        {
            "allocate_replica": {
                "index":"wlxt_beijing_xiangzhenjie",
                "shard":0,
                "node":"node19"
            }
        }
    ]
}'
但是报错了,显示分配失败
[allocate_replica] trying to allocate a replica shard [wlxt_beijing_xiangzhenjie], while corresponding primary shard is still unassigned]
接着考虑重建索引,依然能保留数据。https://www.elastic.co/guide/en/elasticsearch/reference/current/docs-reindex.html
curl -X POST "192.168.18.19:9200/_reindex?pretty" -H 'Content-Type: application/json' -d'
{
  "source": {
    "index": "wlxt_beijing_xiangzhenjie"
  },
  "dest": {
    "index": "wlxt_beijing_xiangzhenjie1"
  }
}'
重建成功后删除原索引,
curl -X DELETE 192.168.18.19:9200/wlxt_beijing_xiangzhenjie
但是我的新索引并未建成功,报错SearchPhaseExecutionException: all shards failed,刚开始查 docker 日志也是这个错误,说明这个方案也失败了。
然后继续考虑重新手动分配主分片:allocate_stale_primary
curl -X POST '192.168.18.19:9200/_cluster/reroute' -H "content-type:application/json" -d '
{
    "commands": [
        {
            "allocate_stale_primary": {
                "index":"wlxt_beijing_xiangzhenjie",
                "shard":0,
                "node":"node19",
                "accept_data_loss":true
            }
        }
    ]
}'
注意使用allocate_stale_primary会导致部分数据丢失,"accept_data_loss":true让你知道自己在干什么,所以要有备份数据。但是执行后还是报错
No data for shard [0] of index [wlxt_beijing_xiangzhenjie] found on node [node19]"},"status":400}
最后使用allocate_empty_primary,分配一个空的主分片给一个节点,意味着对应索引上的数据都没了。
首先查看http://192.168.18.19:9200/_shard_stores?pretty,这里可以看到所有未分配的分片。执行以下命令:
curl -X POST '192.168.18.19:9200/_cluster/reroute' -H "content-type:application/json" -d '
{
    "commands": [
        {
            "allocate_empty_primary": {
                "index":"wlxt_beijing_xiangzhenjie",
                "shard":0,
                "node":"node19",
                "accept_data_loss":true
            }
        }
    ]
}'
再次查看发现已经没了wlxt_beijing_xiangzhenjie这个索引,修改依然存在的索引继续执行,直到出现如下所示,再去看你的集群应该是green
{
  "indices": {}
}
最后一步,将对应索引的数据重新导入一遍。